画像処理
画像の回転、余白のトリミングといった画像の操作やエッジ検出などの画像処理を行うサンプルです。
以下のコマンドを実行すると、画像処理に使えるすべてのXファンクションのリストを確認できます(Proでしか使用できないものもあります)。
lx cat:="image*";
画像の回転とトリミング
画像の回転、余白のトリミング、自動レベルの適用により、画像をクリアでコンパクトにします。
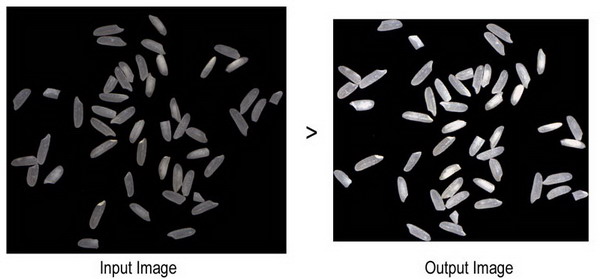
// プロジェクトエクスプローラに新しいフォルダを作成
pe_mkdir RotateTrim path:=aa$;
pe_cd aa$;

// 行列を作成して画像をインポート
window -t m;
string fpath$ = "samples\Image Processing and Analysis\rice.bmp";
string fname$ = System.path.program$ + fpath$;
impimage;
window -r %h Original;

// 元の画像の次数を取得
matrix -pg DIM nCol1 nRow1;

window -d;	// 画像を複製
window -r %h Modified;

imgRotate angle:=42;
imgTrim t:=17;

matrix -pg DIM nCol2 nRow2; // 修正された画像の次数を取得

imgAutoLevel;// 自動レベリングを適用

window -s T;	// ウィンドウを水平に並べる

// レポート
window -n n Report;
old = type.redirection;
type.redirection = 2;
type.notes$=Report;
type "Dimension of the original image: ";
type "   $(nCol1) * $(nRow1)\r\n";   //  "754 * 668"
type "Dimension of the modified image: ";   //  "688 * 601"
type "   $(nCol2) * $(nRow2)\r\n";
type.redirection = old;
エッジ検出
画像から背景画像を減算してエッジを検出します。
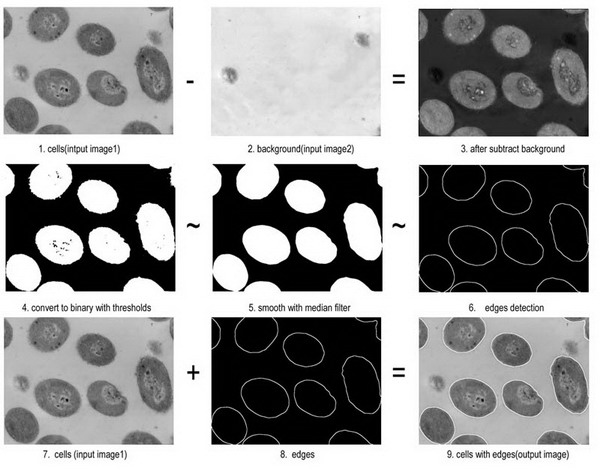
// プロジェクトエクスプローラに新しいフォルダを作成
pe_mkdir EdgeDetection path:=aa$;
pe_cd aa$;

// 行列を作成して細胞の画像をインポート
window -t m;
string fpath$ = "samples\Image Processing and Analysis\cell.jpg";
string fname$ = System.path.program$ + fpath$;
impimage;
cell$ = %h;

// 行列を作成し背景の画像をインポート
window -t m;
string fpath$ = "samples\Image Processing and Analysis\bgnd.jpg";
string fname$ = System.path.program$ + fpath$;
impimage;
cellbk$ = %h;


// 背景を減算して前処理
// x, yはImage2のオフセット
imgSimpleMath img1:=cellbk$ img2:=cell$ func:=sub12 x:=7 y:=13 crop:=1;
// 最低、最高強度を指定して二値化
imgBinary t1:=65 t2:=255;
// メディアンフィルタの大きさは18
imgMedian d:=18;

// エッジ検出
// エッジピクセルを決定する閾値は12
// エッジ検出フィルタshv(Sobel horizontal & vertical)を適用
imgEdge t:=12 f:=shv;
edge$ = %h;

// 細胞画像にエッジを戻す
imgSimpleMath img1:=edge$ img2:=cell$ func:=add;
window -z;
グレーイメージにRainbowパレットを適用
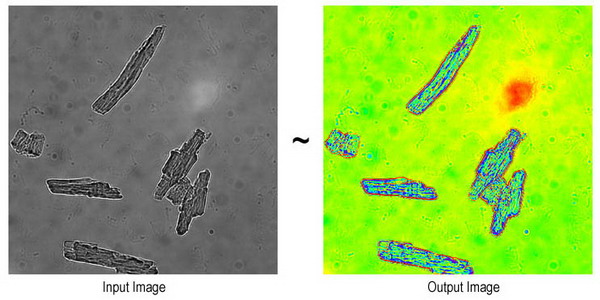
pe_mkdir Conversion path:=aa$;
pe_cd aa$;

// 行列を作成してサンプル画像をインポート
window -t m;
path$ = System.path.program$;
fname$ = path$ + "samples\Image Processing and Analysis\myocyte8.tif";
impimage;
window -r %h Original;

window -d;	// 画像を複製
window -r %h newimage;

imgC2gray;	// グレースケールに変換

// パレット適用
fname$ = System.path.program$ + "palettes\Rainbow.PAL";
imgpalette palfile:=fname$;

window -s T;	// ウィンドウを水平に並べる
画像をデータに変換
画像を行列オブジェクトにインポートした場合、画像形式を保っており、ウィンドウの右上にiのアイコンが表示されます。2D FFTのような数学操作を行うには、これをデータに変換する必要があります。データに変換すると、ウィンドウ右上のアイコンはDになります。
このスクリプトサンプルは、複数画像を行列ブックにインポートして、データに変換します。
// ワイルドカードを使ってファイルを検索
string path$=system.path.program$+"Samples\Image Processing and Analysis";
findFiles ext:="*tif*";

// 新しい行列ブックを作成し、新しいシートにすべての画像をインポート
newbook mat:=1;
impImage options.FirstMode:=0 options.Mode:=4;
// シートをループして画像をデータに変換
doc -e LW {
   img2m om:=<input> type:=1;
}
その他のスクリプトサンプル